Monday, November 29, 2010

Vintage Button Molds

Have you ever heard of Amazing Mold Putty? I received some a couple weeks ago and had the chance to try it out last week. It truly is amazing. I went through my button box (it used to belong to my grandma, so most of these buttons are 30 or more years old!) and found an awesome variety of buttons to make reproductions of and use in card-making.


All you have to do is combine equal amounts of the two different putties that are in the package. You only have a couple of minutes to work. I mixed the putty and pressed the button right into it, flattening it into the table. It sets up in 20 minutes. Here are are a few of the buttons after they were removed from the mold.


For the button with buttonholes, I just bent the mold (it's very flexible) and snipped off the little bumps with scissors. I think a bit of bling will look pretty good right in the center of that button!


I made thirty molds in a short afternoon, and barely made a dent in the container!


Look at the detail! I am trying this one out with Opalettes embossing powder. I just filled the mold with the embossing powder and put it into my little craft oven at 350 degrees for a couple minutes. It can take temperatures up to 375 degrees!


Look at the detail! I can't wait to use this on a card! It's lightweight, too!


Next, I want to try polymer clay in these molds and bake them. I will post pictures then! I'm really happy with this product and what I'll be able to do with it.

Tuesday, November 23, 2010

Great News!

I have just been announced as one of the winners in the Spellbinders Holiday Hoppin' Blog Hop, winning a prize package worth over $500.00! Here are the prizes and Spellbinders Promotional Partner items that I've won:

2 Large Stamp Sets of Winner’s Choice

HCD 704 Perfect Petal Die and HCPC 3316 Poinsettia Petals PreCut Set

Nesties™ Ornaments Stamp Set on Cling Cushion

Musical Memories, Heirloom Ornament Stamp, Winey Viney Stamp, 7×5 Corrugated Board

Creatopia 12″ machine

Gift For You stamp set, a Decorative Paper Pack and Coordinating Ribbon

JR CL 02020 Sparky the Snowman Package

Post-it® Craft Paper plus an assortment of other Post-it® products

Christmas Past Deluxe Edition Paper Pad

5 bottles of Dew Drops

Pixie-Licious prize kit!

One MyStick™ Permanent Dispenser, One MyStick™ Repositionable Dispenser, One MyStick™ Repositionable Dots Refill, One Crafty Power Tape

2 sheets and 1 cardstock sticker sheet of the entire line from Happy Holly Days and Sugar Cookie

Nestabilities® friendly stamp sets, Dash it All

30 yards of our Swirl & Dots n Edge ribbons and an embellishment kit filled with assorted paper fasteners and metal embellishments

1 Love Birds Paper and Stickers Kit, 1 Hot Chocolate Paper and Stickers Kit

Gina K Stamps Heirloom Ornament, Gina K Stamps Winter Mittens

And from Spellbinders: One Grand Calibur™ and Grand Nestabilities® die template (winner’s choice)

Items should start arriving at my house in mid-December! Just call me if you want to come over and play! Hugs!

Thursday, November 18, 2010

Get Well Card


Here's a get well card I made for my boss's wife who fell and suffered a skull fracture. She is now home from the hospital and recuperating, but still needs our prayers. Thanks for looking!

Wednesday, November 17, 2010

Name Frame Tutorial


These are just general guidelines for making a name frame. You can make them any size you want, with any theme. I just thought the beaded star accent was cool and this might help you if you want to try making one for yourself! The silver paper is quite reflective in the photo, but it does show the lettering!


I wanted to make this to fit an 11 x 14 frame, so I had to cut two pieces of paper down to 11 inches, then cut the second piece of paper to 2 1/2 inches.


I used adhesive and put the two pieces of paper together with a 1/2" overlap. You could make this smaller and use just a 12 x 12 or 8 1/2 x 11.

I alternated the layers for each letter, using Spellbinders square dies and the eyelet square die. I had a silver with green layer and a green with silver layer.

I used my Sizzlits to cut out the letters of her name from the same pink paper that I used for the background.

Here is the layering process for each letter. First the eyelet square piece in silver, with the green square centered on top.

Then I applied the letter to the top.

I cut out numerous stars and star outlines from the silver paper, using 5 different sizes of star punches. (I didn't know I had that many sizes!)

Now for the center star...I just drew a star the size that I wanted it to be, traced it on the back of the silver paper and cut it out.

Using my Scor-Pal, I scored through the star from the point at the top to the intersection at the bottom on all five points.

This got a little tricky. The points got folded up and the opposite side got folded down.

I found that if I did this gently, going around the star a couple of times to get the correct fold, it seemed to work.

The completed 3-D star!

Add a pretty bit of bling!

Next I took some of the silver stars and pressed them down into my embossing pad.

Cover each one with embossing powder. I used Hologram Highlights from Stampin' Up.

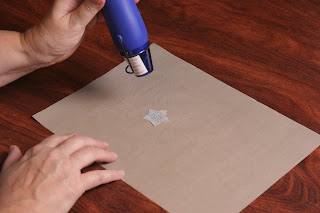
Next, use your heat gun to emboss.

Now for the fun part! I cut three pieces of jewelry wire about 5 inches long. I glued a clear silver-lined seed bead to the end of each piece and let it dry. Then I strung more of the seed beads onto the wire, adjusting so that there were three different lengths.

I used more glue at the top, sliding the top two beads apart and putting some glue on the wire, then letting the bead slide down onto the glue. There is no stress on these beaded attachments, so it doesn't have to be a lot of glue.

Completed shooting star! After these pictures were taken, I decided to make a change to the name frame. The star theme was chosen because Kennedy's favorite song is "Starry Night" by Chris August, so I chose to add those words to it. I used the same star punches and alternated sizes, using green for the background star, silver for the front star, and the same pink paper for the letters. I did have to use smaller Sizzlit letters. All the components were adhered to the background paper. Finished! Please feel free to comment and help me improve!